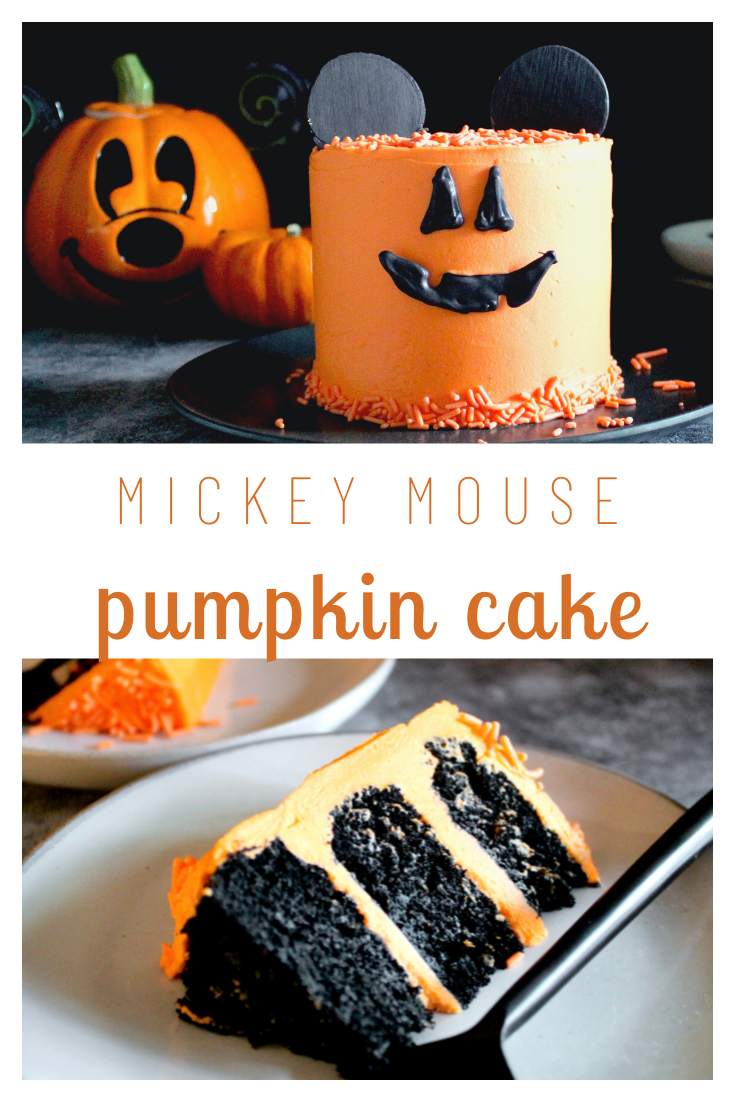
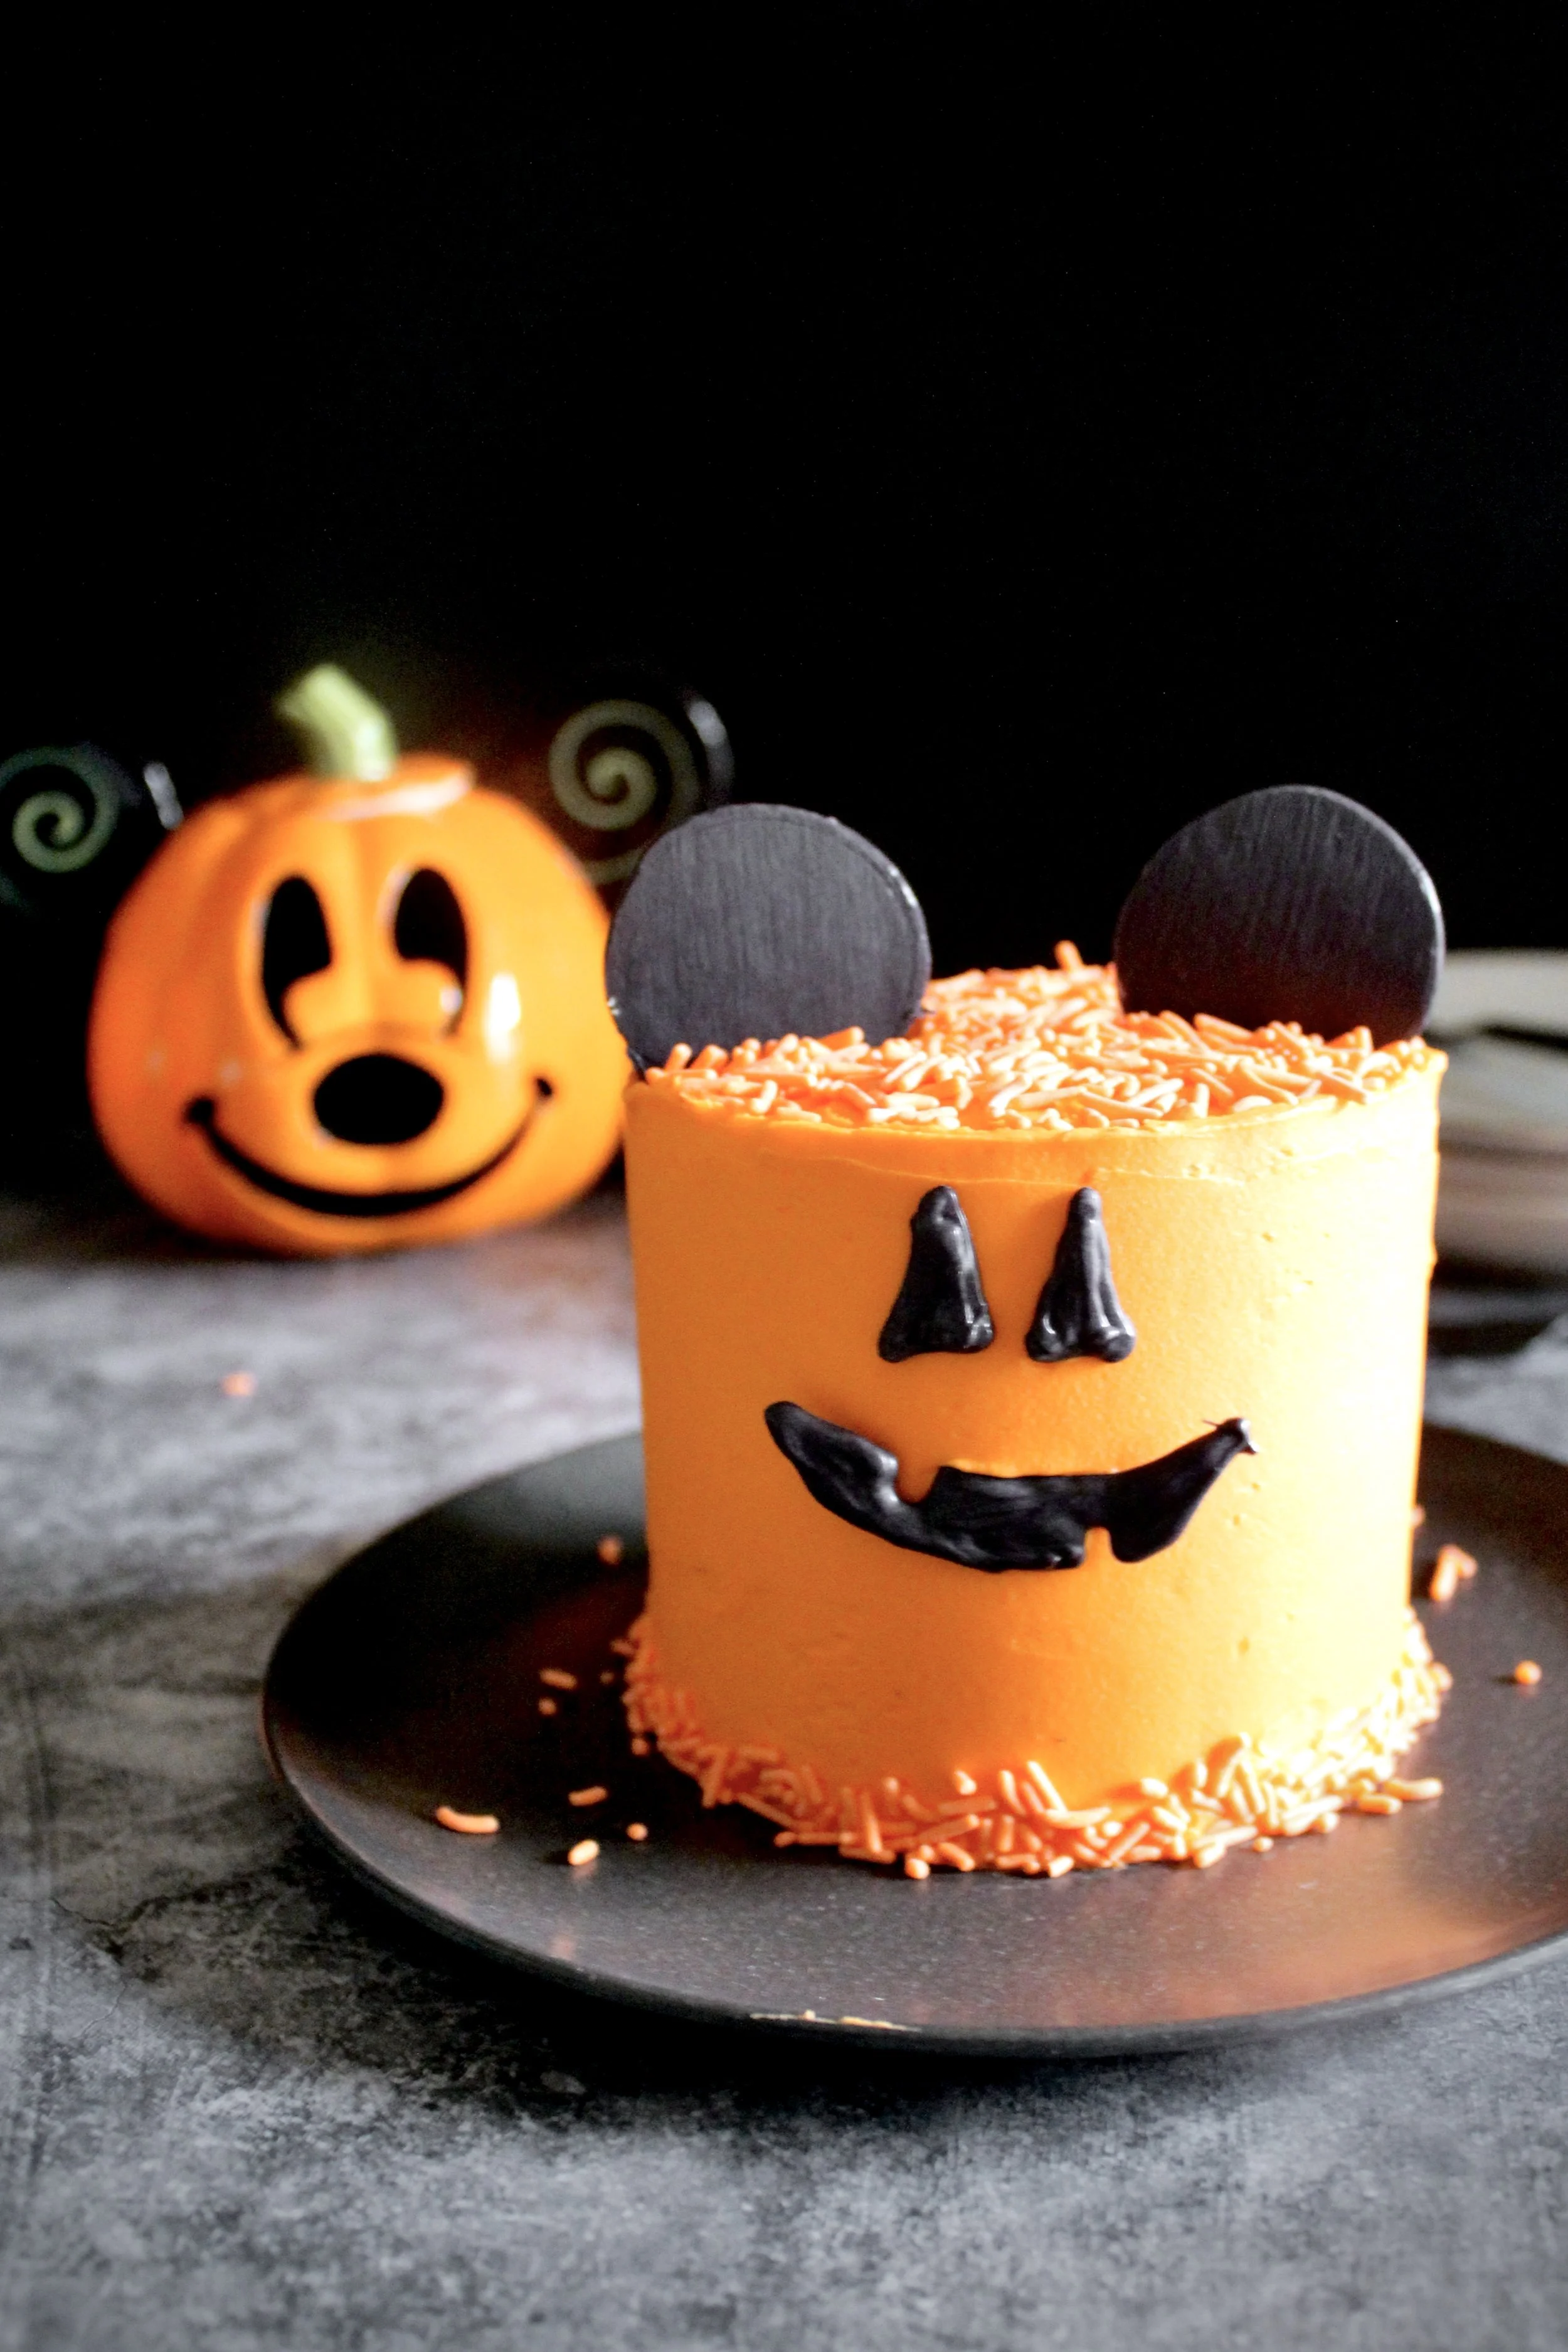
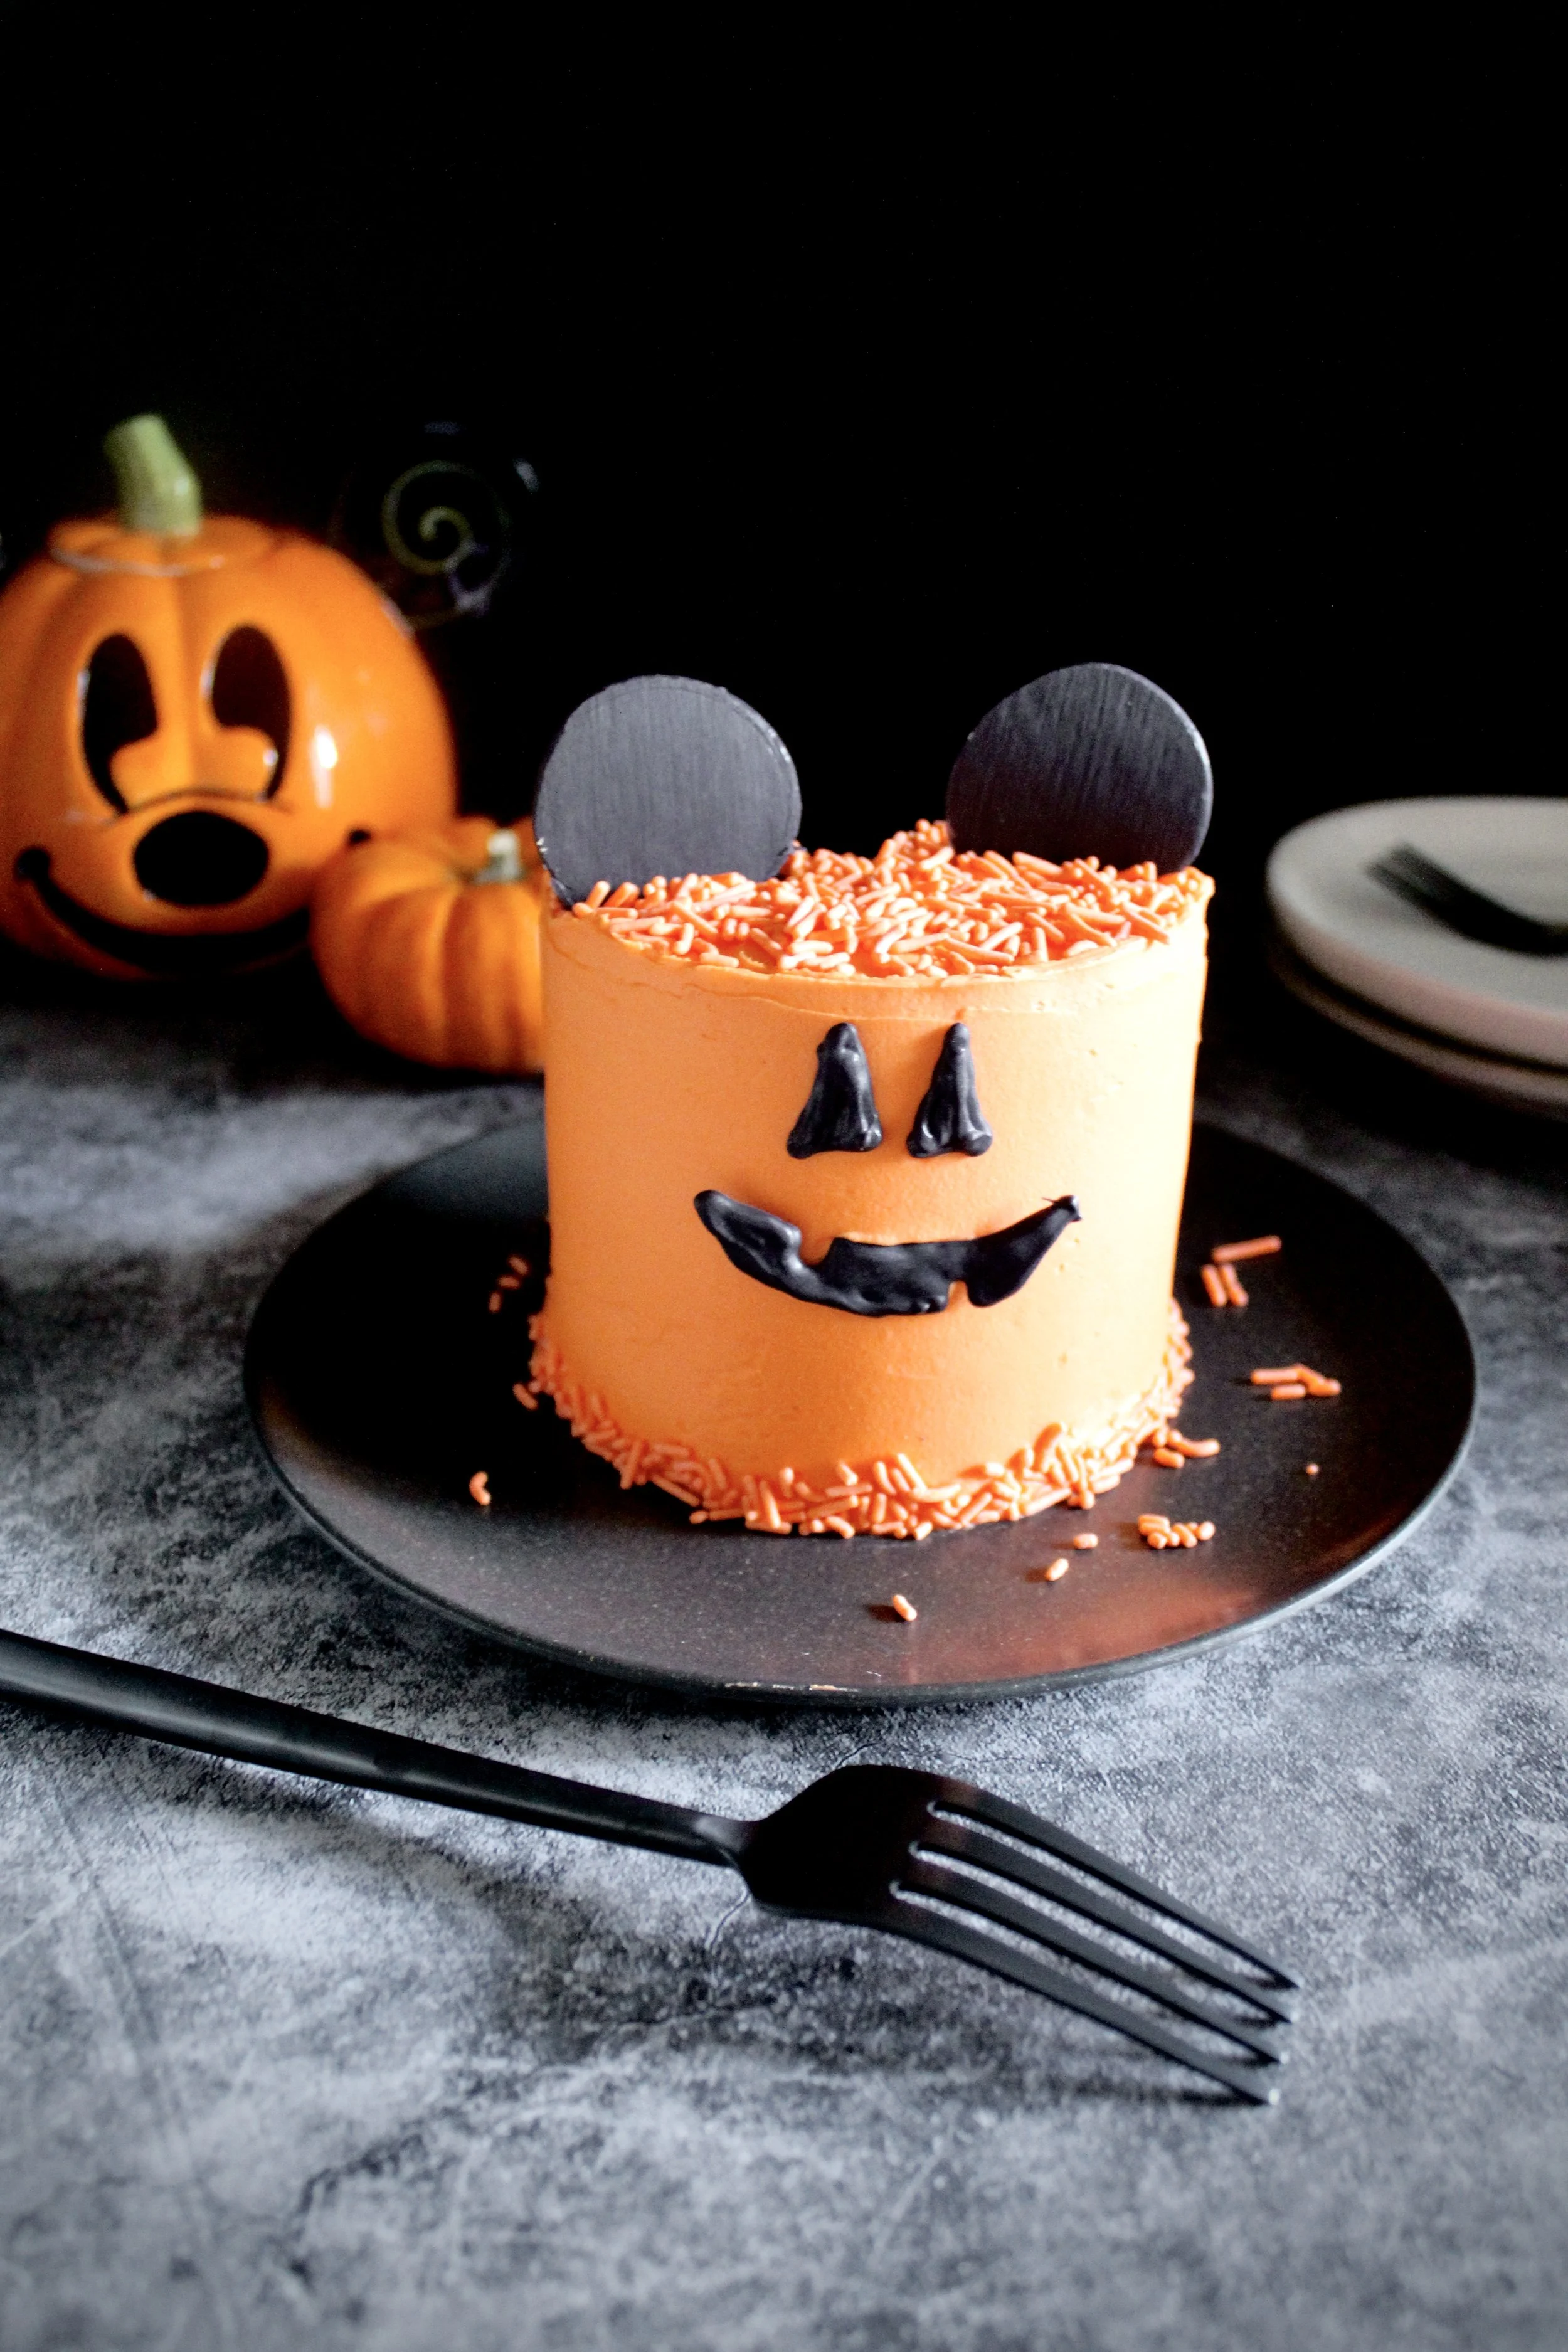
Mickey Mouse Pumpkin Cake
Fluffy, rich black chocolate cake layers frosted with bright orange buttercream and decorated with the cutest Mickey Mouse jack-o-lantern candy! This cake is not only delicious, it’s also a fun family activity and is sure to be a hit for any Halloween or fall celebration!
This post may contain affiliate links from which, at no additional cost to you, I may earn a small commission to keep this site running. Only products I myself would or do use are recommended.
Who’s excited for Halloween?? I am, partly because I do love the holiday and it can be super fun, but also because, in this house, Christmas starts November 1. We’ve had a very, very rough few months, so Christmas can’t come soon enough.
But I still plan to celebrate fall and Halloween in the meantime! It’s so fun when you have young kids. My daughter will be a lovely little unicorn this year and we’re doing a Trunk or Treat and will be decorating our car to match her. I’m just going with it and embracing all of the unicorns and sparkles and pink in my life.

You know what’s not pink or sparkly? Mickey Mouse pumpkins. This cake started out as a “use up the leftover cake and frosting in my freezer” cake. I had this idea to make a fun, Halloween, spooky cake. But a black and orange cake on its own isn’t very impressive. It felt empty when I first frosted it.
As I was trying to brainstorm and also trying desperately to photograph the cake before the sun went down, I started grabbing random Halloween decorations off our shelves. Enter the ceramic Mickey Mouse pumpkin we bought at Disneyland (this is actually our second pumpkin, because I broke the first one…).
And that’s when genius struck: make a Mickey Mouse pumpkin cake.
It was a perfect way to use up the black candy melts I’ve had for maybe longer than I should.
And look how cute this little guy turned out! It gave me exactly one day of no unicorns and all things Mickey pumpkin. I’ll take it.

Why this recipe works
First, the cake. This was an accidental experiment that went well right at the start of the pandemic—a win I sure needed at the time. For my black chocolate cake, I altered my regular chocolate recipe to include a little less oil and an extra egg. The result is a very fluffy, sturdy, still-moist cake that tastes divine. You don’t need as much sugar, either, because the chocolate is naturally a little sweet (not sweetened, just not bitter). Plus, the color is perfect for Halloween.
And the buttercream! I think orange is my favorite color to dye buttercream. It’s always bright and cheery and doesn’t require tons and tons of gel to dye it, like red can. Plus, this buttercream is so perfectly smooth, thanks to European style butter, and has a great flavor, thanks to extra vanilla.
The Mickey decorations are just the cherry on top. Cute and delicious! Black candy melts will actually taste like white chocolate, but if you prefer classic, melt some dark chocolate chips and it’ll look nearly identical!

Key ingredients
Flour. Be sure to spoon then level or weigh your flour.
Sugar. I love using organic! Don’t skimp, as this is the minimum amount you need to make the cake rise.
Black cocoa. Adds a little sweetness and gives that awesome color!
Baking soda and powder. Be sure this isn’t expired!
Salt. Salt helps bring out the flavor.
Eggs. Make sure these are fresh, too!
Oil. I prefer avocado or grape seed, as they are the “healthy” oils that can tolerate high heats.
Buttermilk. Make your own by combing 1 tablespoon white vinegar and enough whole milk to equal 1 cup total. Let it sit 10 minutes.

Hot coffee. I prefer light or blond roast for chocolate cake.
Vanilla. Using a little extra is key to the flavor of the cake and frosting.
Butter. European is best, as it has less water.
Powdered sugar. Add a little at a time, so it’s not sickly sweet.
Heavy whipping cream. Not always necessary, depending on the weather, but helps smooth out the frosting. Use sparingly.
Gel food coloring. Gel will give a better color without watering down the frosting.
Black candy melts or dark chocolate chips. Both will create adorable, delicious pumpkin features!

How to make a Mickey Mouse Pumpkin cake
1. Make the blackout chocolate cake. Be sure to follow all directions, such as using room temperature ingredients, sifting the dry ingredients, slowly adding the coffee, and mixing it all for exactly 2 minutes.
2. Make the orange buttercream. You can make this ahead of time and let the color deepen in the fridge.


3. Make the pumpkin face and Mickey ears. Melt the candy or chocolate, place in a piping bag with a small writing tip like the #2 or just use a new bag and sip a tiny hole so you can control the design. I did mine freehand, but I suggest drawing what you want then flipping the paper over and tracing it with the candy/chocolate (so you don’t get ink or lead in your cake).
4. Frost the cake. Try to do a thin crumb coat and chilling it before doing a final coat, so you have a nice and clean cake to decorate.
5. Decorate. I used orange jimmies before adding the face and ears, but another cute idea would be to use a knife to gently draw vertical pumpkin lines around the cake.
Enjoy!
Tips and FAQ’s for this recipe
How do I draw the face and ears?
I honestly did it freehand. You could draw out the features on the parchment paper and flip it over (so you don’t get ink or pencil lead on the candy or chocolate), then pipe the candy/chocolate over that. If you’re truly meticulous, you could print out the eyes, mouth, ears, etc. and trace it onto the parchment. The goal is to have fun with it. You could also make other designs, like this ghost that accidentally turned into a Harry Potter ghost, wand and all, because drips happen.

Can I split up the work?
Yes! I actually didn’t do anything but melt candy and decorate the day I made this cake. The cake layers and frosting had been frozen, so I left the frosting out on the counter and put the cake layers in the fridge before I went to work. (Frosting takes significantly longer to defrost and become smooth, which is why I let the cake layers defrost more slowly in the fridge.) Wrap the cake layers twice in plastic wrap and freeze until ready to use. The frosting can be refrigerated in an airtight container, unless you want to make it more than 2 weeks in advance, in which case you’d need to freeze it. Both options will deepen the orange color of the buttercream.

Be sure to cut the domed top of the cake
This cake recipe tends to turn out a more domed top than most of my other cakes. If you don’t trim it, you’ll have a lopsided cake, so use a serrated knife to cut off the domed top and level it out. I always save the trimmings in a bowl for my husband, but you could also crumble it up and mix it with leftover frosting to make cake balls!

Be sure to press the Mickey ears in enough to stand up
Mine fell over a few times. I ended up pressing them down quite a bit to get them nestled in and secure. If the cake will be traveling, it may be wise to assemble the face and ears once you get to your destination.

My cake tools
Here are my must-have tools I use for making this cake. Affiliate links provided.
Fine mesh sieve (because sifting is KEY for a fluffy cake)
6” aluminum cake pans (I’ve found nonstick doesn’t bake as evenly)
Offset spatula for frosting the cake
Piping tip (to create fine detail in the face)


Mickey Mouse Pumpkin Cake
- prep time: 40-45 minutes
- bake time: 20-25 minutes
- total time: 1 hour, 10 minutes (plus at least 30 minutes for cake to cool)
servings: 12-16
Ingredients:
for the blackout chocolate cake
- 1 ⅔ cups (335g) granulated sugar
- 1 ⅔ cups (226g) flour, sifted
- ¾ cup (75g) black cocoa powder, sifted
- 2 teaspoons (8g) baking powder
- 1 teaspoon (5g) baking soda
- ½ teaspoon (3g) sea salt
- 3 eggs, room temperature
- 1 cup (236g) buttermilk, room temperature*
- ⅓ cup (108g) avocado oil (can sub vegetable or canola oil)
- 1 tablespoon (13g) pure vanilla extract
- 1 cup (240g) hot, light roast coffee (or hot water)
for the pumpkin-orange frosting
for the Mickey decorations
- black candy melts or dark chocolate chips
- piping bag
- piping tip suitable for writing
- orange sprinkles (optional)
Instructions:
make the blackout chocolate cake
- Preheat your oven to 325F/165C. Lightly grease and flour three 6” cake pans (or use baking spray) and line the bottom with parchment paper or silicone baking mats. This is also a great time to set your coffee to percolate (unless using hot water or espresso and hot water, which is what I do).
- Whisk together the sugar, flour, cocoa powder, baking powder, baking soda, and salt in the bowl of your stand mixer or a large mixing bowl, sifting everything but the sugar (unless yours is fine enough to sift--go for it!). Set aside.
- In a separate medium mixing bowl, whisk the eggs, buttermilk, oil, and vanilla together until well-blended and fully emulsified, about 1 minute.
- Very, very slowly stream the hot coffee or water into the wet ingredients, whisking vigorously and constantly as you pour to avoid scrambling the eggs. Feel free to do this in segments if it’s easier. If you do scramble some of the eggs, you can run the mixture through your fine mesh sieve to remove the cooked egg bits.
- Using the paddle attachment, turn your stand mixer to low (or use a hand mixer) and slowly pour the wet ingredients into the dry. This should take about 30 seconds or so. The batter will clump up then thin out. Once you’ve poured all the wet ingredients, immediately turn off the mixer. Scrape down the bottom and sides. Beat on medium for exactly 2 minutes (set a timer).
- Evenly divide batter between the prepared cake pans.
- Bake for 20-25 minutes, until a toothpick inserted in the middle comes out with just a few moist crumbs (ideally not fully clean, as this could mean it’s over baked). Check early and rotate halfway if not using convection. Also check each cake layer each time, as one might bake faster than another.
- Let cool 5-10 minutes in the pan then remove to a cooling rack to cool completely.
make the orange buttercream
- While the cake cools, make the classic vanilla buttercream.
- After the flavor is good and you have “whipped” the buttercream, add in about ⅛ teaspoon orange food gel. Mix on medium until combined. Add more gel as needed until desired color is reached. You can also deepen the color by refrigerating the buttercream overnight.
make the Mickey decorations
- Melt the candy melts according to the package directions. If using chocolate chips, melt in a heatproof bowl in the microwave in 30 second intervals at half power, stirring between. Once it begins to melt, only microwave for 10 seconds at a time. You can also use a double boiler or makeshift double boiler by setting a heatproof bowl over a medium saucepan with 1-2” simmering water, but be sure to stir constantly and remove from heat when about 75% melted and stirring until smooth.
- Place the melted candy/chocolate in your piping bag fitted with a writing tip. Alternatively, if you have a closed piping bag, you can simply trim the end to be very small instead of using a piping tip.
- On a piece of parchment or wax paper, draw out your pumpkin “face” features then flip the paper over (so you don’t get lead or ink on the chocolate). You can hold these up to the cake to make sure the size is to your liking. Feel free to do any shape or design you like. Make sure to scale the ears so they will stand up on the cake.
- Let the candy or chocolate designs cool while you frost the cake.
assemble
- Use a serrated knife to cut off any domed tops of the cake layers. (You can save those to eat later or make cake balls out of them by crumbling them up and mixing with leftover frosting!) Fill and frost the cake. I recommend a thin crumb coat, followed by 10 minutes in the fridge, then frosting fully so you don’t have any chocolate cake crumbs in the frosting.
- Apply the pumpkin face and Mickey ears. I used orange jimmies sprinkles on top and around the bottom. You could cover the whole cake in sprinkles or use a knife to create pumpkin lines around the sides of the cake. Totally up to you!
Enjoy! If not serving right away, store in an airtight container until ready to eat. Once cut, keep fresh by applying extra frosting to the cut edges or by placing a piece of plastic wrap right up against the cut edge and “sealing” it along the frosting then covering the whole cake with plastic wrap or placing in an airtight cake container.
*You can make your own buttermilk by adding 1 tablespoon white vinegar with enough room temperature whole milk to equal 1 cup total. Stir and let sit 10 minutes while you prep the rest of the ingredients.